Get Started Guide
Welcome to TradPlus Mediation Platform VisiM!
The following instructions help you quickly start and complete the basic configurations of TradPlus VisiM. Kick off your ad monetization journey in just 9 steps.
1,Sign up for a TradPlus account.
2,Add an app.
3,Add units.
4,Add ad sources.
5,Configure waterfall.
6,Authorize reports API.
7,Download and integrate TradPlus SDK.
8,Integration testing.
9,Data analysis and optimization.
If you need any help during the integration, please contact us at contact@tradplus.com.
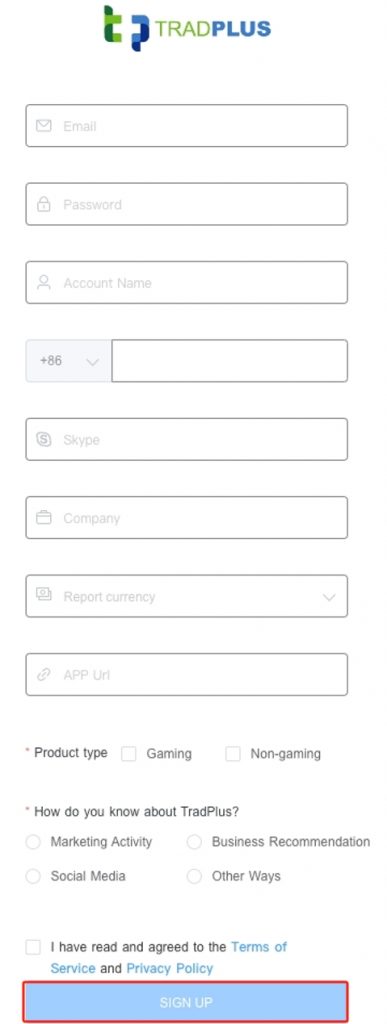
1. Sign up for a TradPlus account
1)Go to TradPlus website:http://tradplus.com .
2)Click [sign up] at the top right corner of the page

3)Fill in the required information
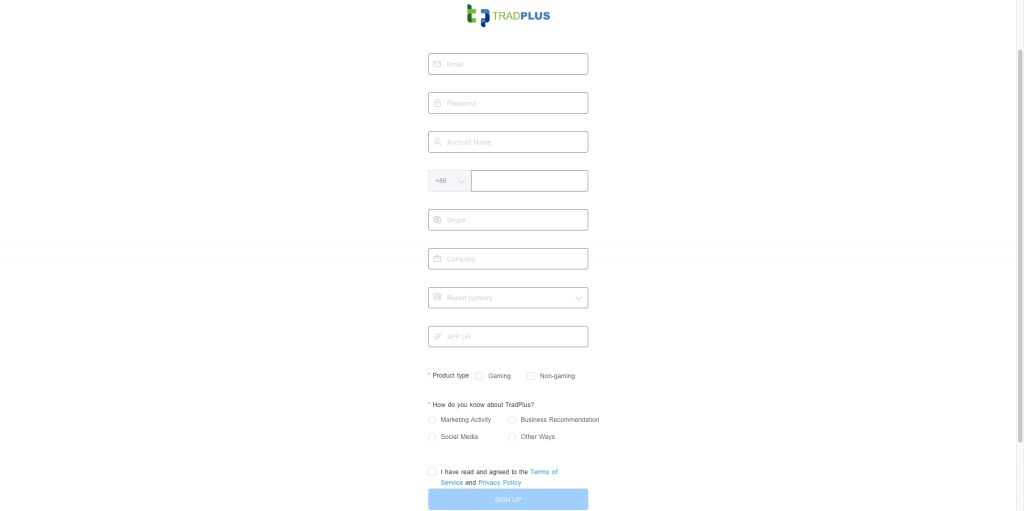
| Sign up information | Instruction |
|---|---|
| Enter your Email Address | |
| Password | Enter a password. Password must be >=8 chars |
| Account name | Enter your account name |
| Cell-phone number | Enter your cell-phone number |
| Skype | Enter your Skype ID |
| Company | Enter your company name |
| Report currency | TradPlus data reports provide statistics in “RMB” and “USD”, please select the currency you wish to use for your report. |
| App Url | Enter your app url(App Store address or APK download address) |
| Product type | If your product is a game app, please choose [Gaming]; for non-game app, please choose [Non-gaming] |
| How do you know about TradPlus? | Choose how do you know about Tradplus? |
4)Check [I have read and agreed to the Terms of Service and Privacy Policy].
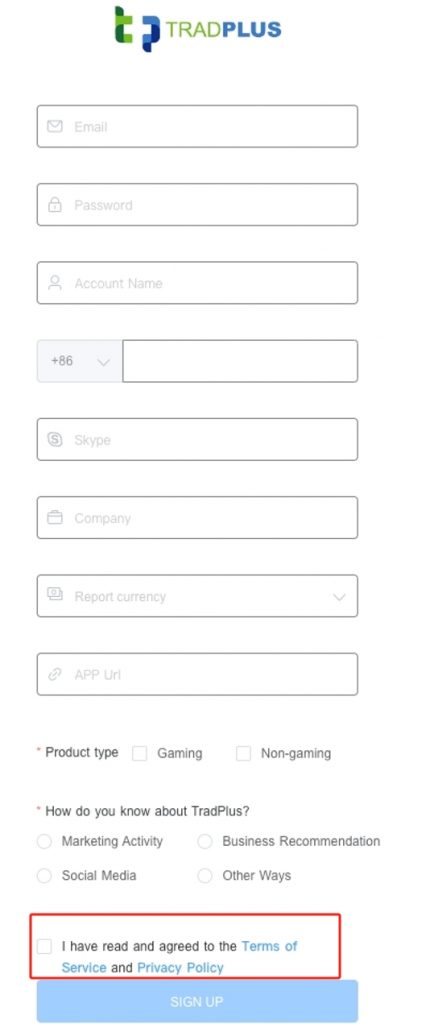
5)After confirming that you have filled in the information correctly, click [Sign Up], and you can log in to the background after successful registration.
2. Add an app
2.1 Procedure
1)Click【App Management】-【Apps & Ad Units】-【Add an app】。

2)Fill in the application related information:
![]()
| App information | Instruction |
|---|---|
| OS | Select the app OS |
| App Store/Google Play/Other app stores/ Not on any store | If your app is for iOS system, or already on App Store, choose [Yes]; otherwise, choose [No]; if your app is for Android system, or already on Google Play, choose [Google Play]; if your app is on other app stores, choose [Other app store]; if your app is not on any store, choose [Not on any store]. |
| App Store URL | Fill in the address of your app in Google Play and click [Verify URL] to verify the address. The URL cannot be changed after it is saved, so please confirm that the link is filled in correctly. |
| App Domain | Fill in the App Domain, such as, tradplus.com |
| Bundle Name | Fill in the bundle Name, such as, com.tradplus.app |
| App Name | Fill in the app name. You cannot change the App name after saving it, so please confirm that the name is filled in correctly. |
| Category | Select the category. If your app is a game app, please choose [Gaming]; for non-game app, please choose [Non-gaming] |
| Sub Category | Select the sub category |
Advanced Settings - Adjust Authorization
- Please continue to fill in the following information if you have enabled the Adjust authorization, or ignore this entry if you have not.
- If you need to activate an Adjust authorization, please contact your TradPlus AM to activate it.
- Please apply for Ad Revenue authorization from Adjustd, otherwise you can't send TradPlus data back to Adjust.

3)After confirming all the information, click [Confirm] to save the application information
2.2 Expected results
You can view the added apps in the app list on the left side of the [Apps & Ad Units] page as shown in the screenshot:

3. Add ad units
3.1 Procedure
1) On the [Apps & Ad Units] page, select the app that needs to add ad units, and click [Add Ad Units] in the upper right corner of the page.

2)Fill in the information of the ad units:
You can check the relationships between TradPlus VisiM ad formats and the ad networks' through Table of Ad Formats

TradPlus VisiM supports the configuration of 6 ad formats as described below:
i. Rewarded Video

| Ad Configuration Information | Instruction |
|---|---|
| Ad Unit Name (Required) | Enter Ad unit name |
| No. of Parallel Requests (Required) | The default number is 2, which is suggested to keep as it is. Developers can adjust later based on actual performance. |
| Capping | ● The default choice is 'Uncapped', which is suggested to keep as it is. Developers can adjust later based on actual performance. ● If you need to configure the display cap, please tap 'Capping' and select the cap and frequency. The screenshot shows each user can see the ad up to 3 times every 4 hours.  |
| Reward Item & Amount | This information can be left unconfigured. The rewarded video's reward callback will follow the one in the code. |
| Server Side Reward Callback | ● After the user finishes watching the video, TradPlus server calls back to your server with a reward message. Supported SDK: TradPlus Android SDK >= 7.9 and iOS SDK >= 7.5. ● To ensure the accuracy of the rewards, it is recommended that developers can prioritize ad networks' server reward callbacks. For TradPlus Exchange and cross promotion, TradPlus server reward callbacks can be used directly. |
| TradPus Exchange Blocking Rules | Please fill in this item if you use TradPlus Exchange, otherwise it can be ignored. (To switch on TradPlus Exchange, please contact your Operation Manager.) |
ⅱ. Interstitial

| Ad Configuration Information | Instruction |
|---|---|
| Ad Unit Name (Required) | Enter ad unit name |
| No. of Parallel Requests (Required) | The default number is 2, which is suggested to keep as it is. Developers can adjust later based on actual performance. |
| Capping | ● The default choice is 'Uncapped', which is suggested to keep as it is. Developers can adjust later based on actual performance. ● If you need to configure the display cap, please tap 'Capping' and select the cap and frequency. The screenshot shows each user can see the ad up to 3 times every 4 hours. |
| TradPus Exchange Blocking Rules | Please fill in this item if you use TradPlus Exchange, otherwise it can be ignored. (To switch on TradPlus Exchange, please contact your Operation Manager.) |
ⅲ. Banners

| Ad Configuration Information | Instruction |
|---|---|
| Ad Unit Name (Required) | Enter ad unit name |
| No. of Parallel Requests (Required) | The default number is 1, which is suggested to keep as it is. Developers can adjust later based on actual performance. |
| Auto refresh | ● Choose whether or not to auto-refresh. ● It is recommended to choose no refresh initially, and after the data is stabilized, you can configure the refresh time as 60s, 120s, 180s and so on. ● If you have configured automatic refresh at TradPlus, please disable the auto refresh at networks. ● If you need to use the TradPlus for auto refresh, but can't turn off the auto refresh at networks, we recommend that you configure a normal auto refresh time at TradPlus, and the longest auto refresh time at networks.For example, if Unity has the banner auto-refresh range from 10s to 40s, it is recommended to configure 40s. |
| Capping | ● The default choice is 'Uncapped', which is suggested to keep as it is. Developers can adjust later based on actual performance. ● If you need to configure the display cap, please tap 'Capping' and select the cap and frequency. The screenshot shows each user can see the ad up to 3 times every 4 hours. |
| TradPus Exchange Blocking Rules | Please fill in this item if you use TradPlus Exchange, otherwise it can be ignored. (To switch on TradPlus Exchange, please contact your Operation Manager.) |
ⅳ. Native Ads
There are 2 types of native ads to choose from:
a. Standard
b. Native Draw video

Specific configuration guidelines are listed below:
** Standard & Native Draw video**
| Ad Configuration Information | Instruction |
|---|---|
| Ad Unit Name(Required) | Enter ad unit name |
| No. of Parallel Requests(Required) | The default number is 2, which is suggested to keep as it is. Developers can adjust later based on actual performance. |
| Capping | ● The default choice is 'Uncapped', which is suggested to keep as it is. Developers can adjust later based on actual performance. ● If you need to configure the display cap, please tap 'Capping' and select the cap and frequency. The screenshot shows each user can see the ad up to 3 times every 4 hours. |
| TradPus Exchange Blocking Rules | Please fill in this item if you use TradPlus Exchange, otherwise it can be ignored. (To switch on TradPlus Exchange, please contact your Operation Manager.) |
ⅴ. Splash

| Ad Configuration Information | Instruction |
|---|---|
| Ad Unit Name(Required) | Enter ad unit name |
| Countdown Times | The default is 5, which is suggested to keep as it is. Developers can adjust later based on actual performance. The range is from 3 to 10 seconds. |
| No. of Parallel Requests(Required) | The default number is 2, which is suggested to keep as it is. Developers can adjust later based on actual performance. |
| Capping | ● The default choice is 'Uncapped', which is suggested to keep as it is. Developers can adjust later based on actual performance. ● If you need to configure the display cap, please tap 'Capping' and select the cap and frequency. The screenshot shows each user can see the ad up to 3 times every 4 hours. |
| TradPus Exchange Blocking Rules | Please fill in this item if you use TradPlus Exchange, otherwise it can be ignored. (To switch on TradPlus Exchange, please contact your Operation Manager.) |
vi. Offerwall

| Ad Configuration Information | Instruction |
|---|---|
| Ad Unit Name��(Required) | Enter ad unit name |
| No. of Parallel Requests(Required) | The default number is 2, which is suggested to keep as it is. Developers can adjust later based on actual performance. |
| TradPus Exchange Blocking Rules | Please fill in this item if you use TradPlus Exchange, otherwise it can be ignored. (To switch on TradPlus Exchange, please contact your Operation Manager.) |
vii. In-stream Ads

| Ad Configuration Information | Instruction |
|---|---|
| Ad Unit Name(Required) | Enter ad unit name |
| No. of Parallel Requests(Required) | The default number is 2, which is suggested to keep as it is. Developers can adjust later based on actual performance. |
| TP Exchange Blocking rules | Please complete this if you use TradPlus Exchange, otherwise it can be ignored. (For TradPlus Exchange, please contact your Operations Manager.) |
3)After filling out the form and confirming that it is correct, click [Confirm] to save the ad unit information.
3.2 Expected result
You can view the added ad units in the ad unit list on the right side of the [Apps & Ad Units] page as shown in the picture:

4. Add ad sources
4.1 Precondition
1)Choose the ad networks and ad formats to integrate, for example, integrate Meta and Admob's rewarded video, banner ads.
2)Sign up for an account on the ad networks' platform. You can find the addresses here:List of TradPlus VisiM integrated ad networks
3)Create an ad unit on each ad network. You can find the instructions here:List of TradPlus VisiM integrated ad networks - Configuration Guide
4.2 Procedure
1)TradPlus VisiM provides 2 ways to add ad sources:
a. Click the [Add Ad Sources] on the right side of the Unit.

b.Click the drop-down arrow on the right side of the button [Add Ad Sources in Batch].

2)Select the ad sources you want to add and fill in the required configuration information for the ad sources.
i. Please check the link below to find the information on how to find the IDs and other information needed for each ad sources.List of TradPlus integrated ad networks - Configuration Guide
ii. Instructions for completing the additional information are provided in the table below:
| Ad Sources Configuration Information | Explanation |
|---|---|
| Rate | ● If a floor price is set for certain ad units on ad networks, please fill in the floor price. ● If not, please fill in 0.01. This price is used to prioritize ad requests and will not be returned to the ad networks. |
| Auto eCPM | It is recommended to turn on auto eCPM. ● When auto eCPM is enabled, TradPlus will leverage the past three days average eCPM to make ranking adjustments. ○ If the number of IMP in the past 3 days is less than 200, the average eCPM in the past 7 days will be used. If the number of IMP in the past 7 days is less than 200, a manually entered eCPM ranking will be used. Average eCPM calculation formula: Total revenue / Total IMP * 1000 |
| Header Bidding | ● If you want to use bidding, please select [Yes]. ● Except Meta, all networks need to create a bidding ad unit at networks' end. Then please enter the Unit ID on TradPlus VisiM. ● For Meta, developers just need to create a regular ad unit on Meta (no need to configure the floor price) and enter the Unit ID on TradPlus VisiM. For ad networks that support bidding, please see:TradPlus supported bidder |


3)After confirming that the filled information is correct, click [Confirm] to save the ad sources.
Note: Please make sure to the Ad ID and other information filled on TradPlus VisiM is consistent with that on ad networks to avoid influence on ad revenue.
4.3 Expected result
Click on "Ad Unit" and in the pop-up drop-down list, you can see the added ad sources.

5. Configure waterfall
5.1 Procedure
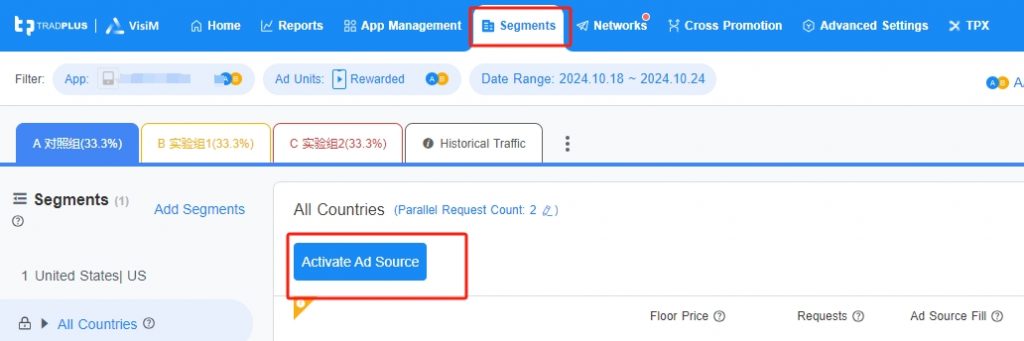
1)Click [Segments] to go to the waterfall configuration page.
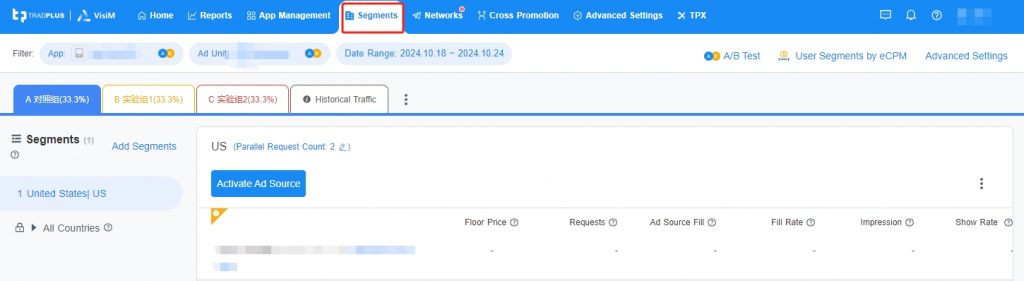
2)After adding ad sources at step 4, the added ad sources will be shown in “All Countries”.
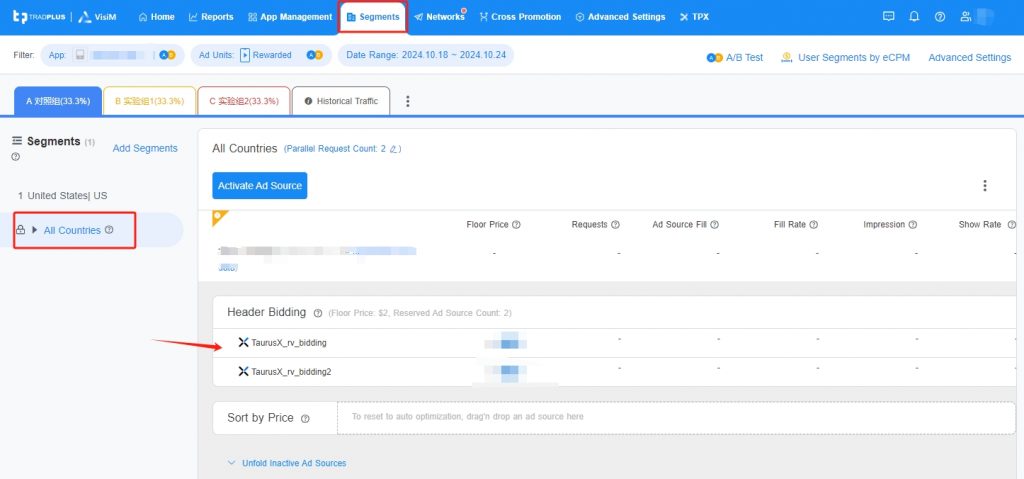
3)You can continue to add more ad sources by clicking [Add ad sources] on the current page, or return to step 4 to add ad sources.
More waterfall configurations can be found in Segment Configuration Guidelines
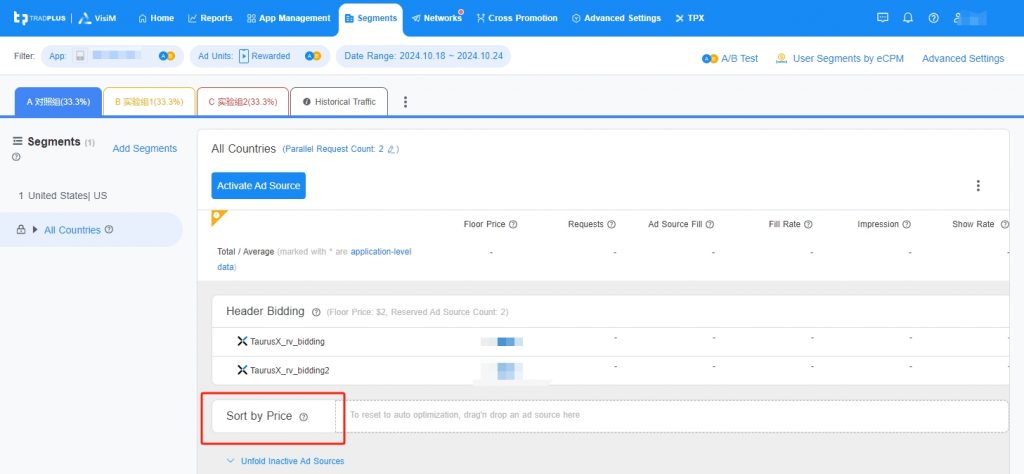
5.2 Expected result
Bidding ad sources are displayed in the "Header Bidding" area, while the rest of the ad sources are displayed from the highest to the lowest in the “Sorted by Price” area.
6. Authorize Reports API
6.1 Procedure
1)Click [Networks] to enter the authorization page.
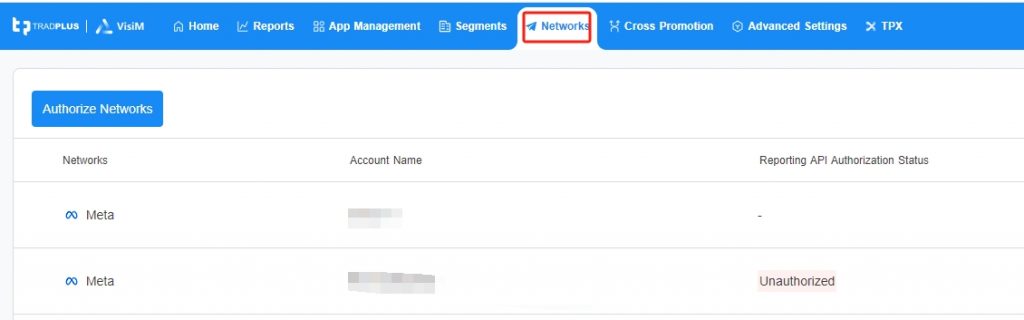
2)If you have added ad sources in “Step 4. Adding Ad Sources”, the ad networks you need to authorize will be automatically shown on the page.
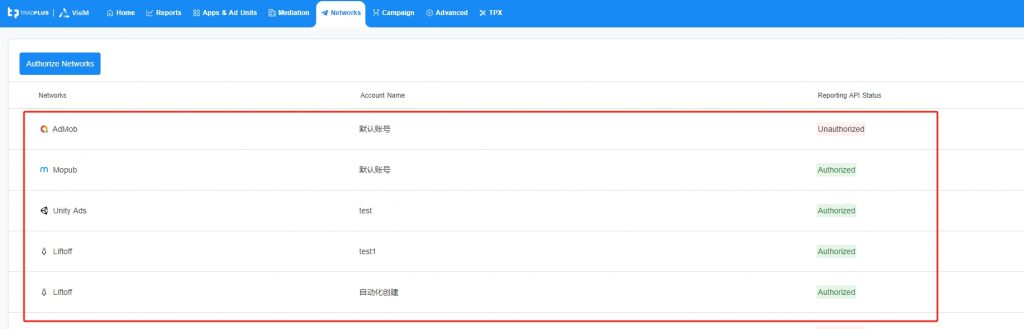
3)Click the [Edit] icon on the right side of the ad network list.

4)Fill in the authorization information. Please check the below link to find more information about ad networks. Guidelines on how to configurate on TradPlus integrated ad networks
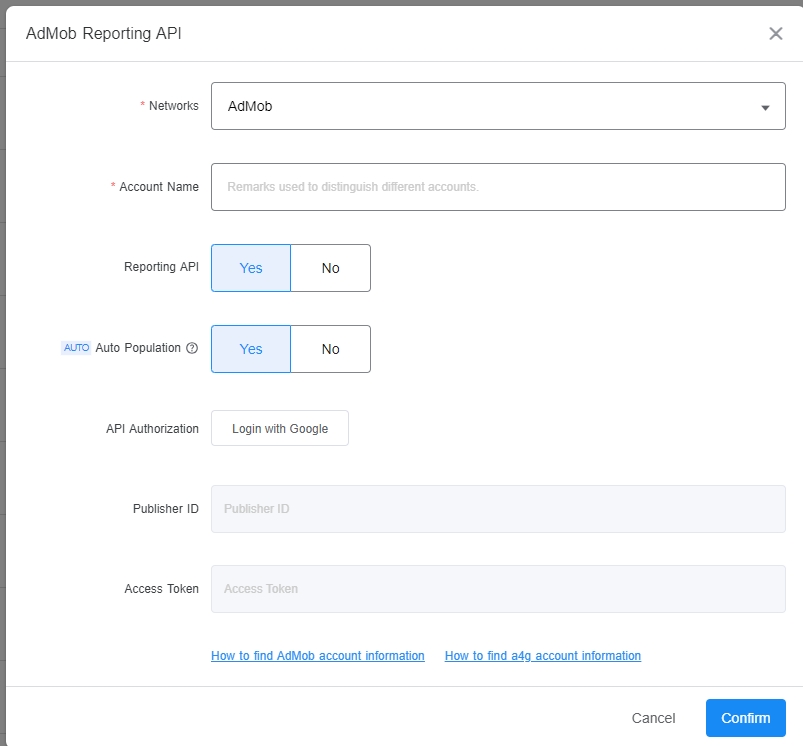
5)After confirming that the filled information is correct, click [Confirm] to save the authorization information.
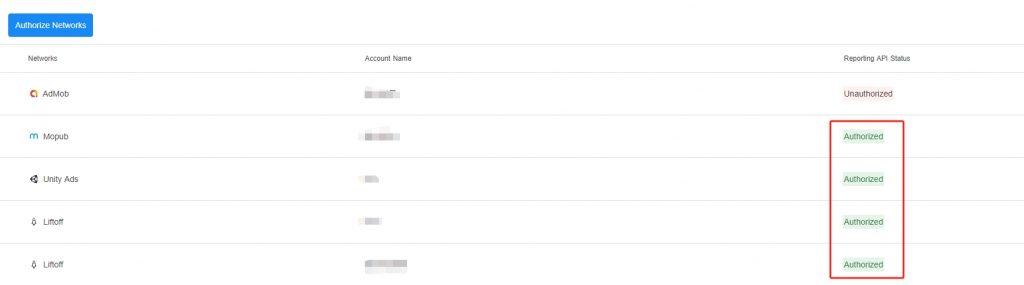
6.2 Expected result
After a successful authorization, the status will is [Authorized].
7. Download and integrate TradPlus SDK
7.1 SDK Download Guide
You can download TradPlus SDK from the below links.
Android SDK: Android SDK download : | TradPlus Knowledge Center
IOS SDK: iOS SDK download | TradPlus Knowledge Center
7.1.1 Android SDK Download Guide
1)Go to the download address and select the desired SDK configuration.
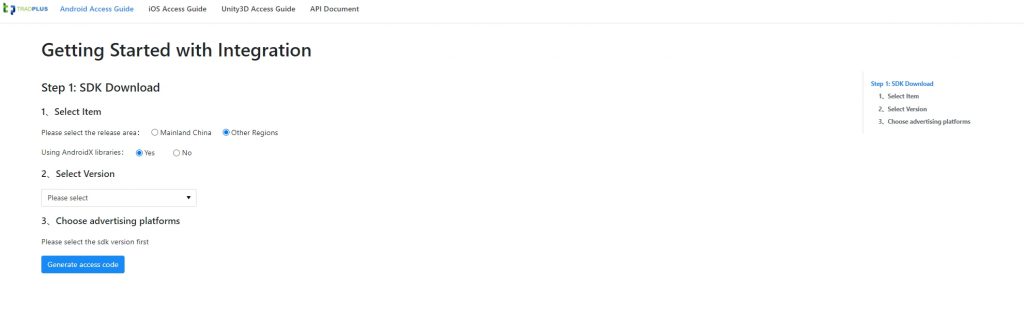
| SDK Information | Instruction |
|---|---|
| Select Item | Please select the release area |
| Using AndroidX libraries | Select whether your project is AndroidX or not. |
| Select SDK Version | Select the appropriate SDK version. The latest version is suggested. |
2)After selecting the SDK version, follow the prompts on the page to continue selecting ad formats and ad networks.
Note:
Different ad networks support different ad formats. Please decide on the ad formats you want to integrate and TradPlus will suggest on the ad networks.
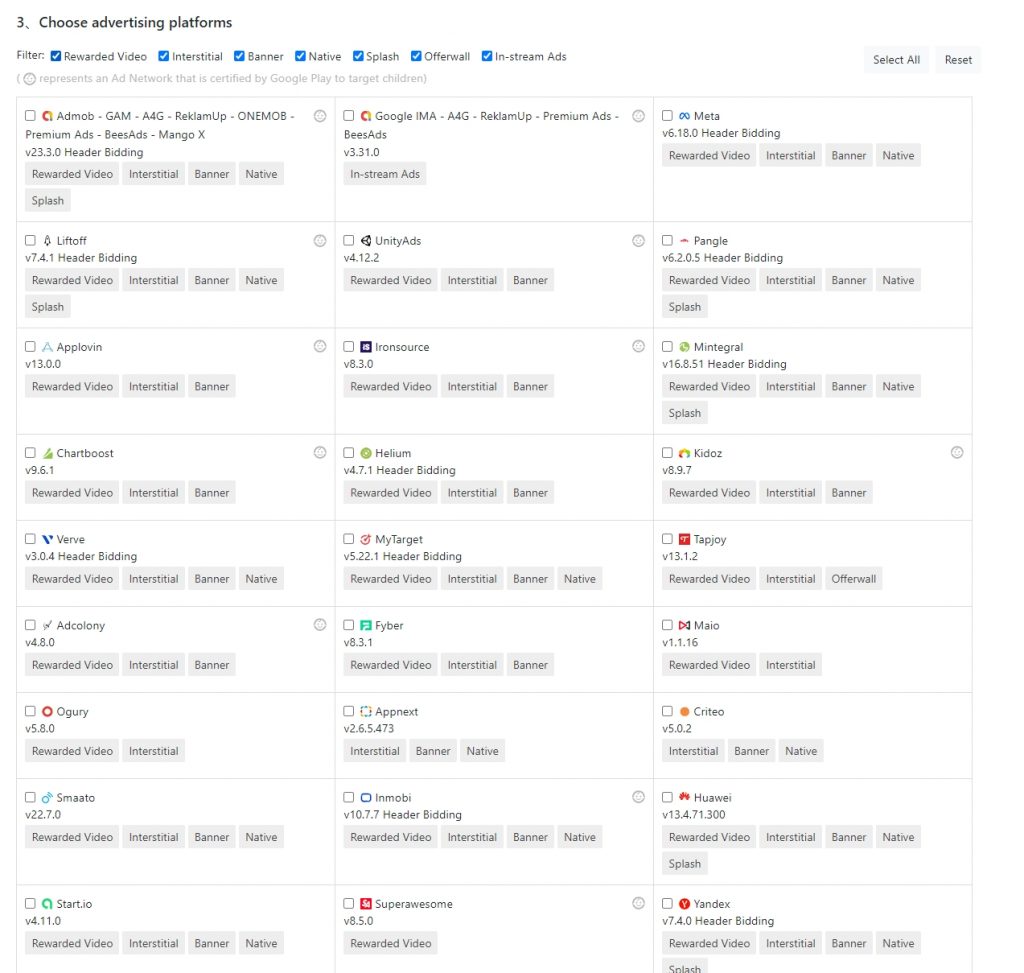
As you can see in the screenshot below, after selecting [Banner], some of the ad networks are grayed out, indicating that these ad networks do not support banner ads for the time being.
3)After selecting the ad networks, click [Generate Access Code].

4)Copy [project's build.gradle], [app's build.gradle], [AndroidManifest.xml], and [ProGuard Configuration] information and save them to a local file for use when integrating TradPlus SDK.

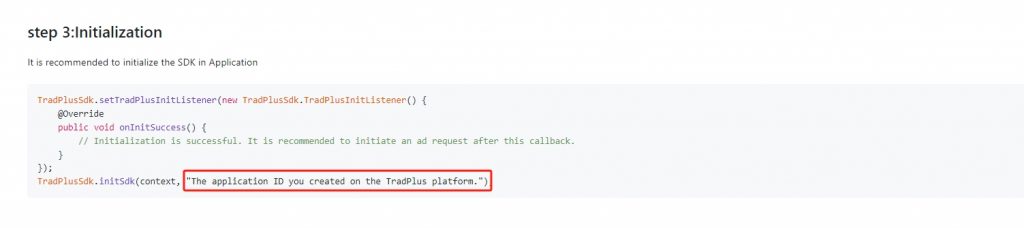
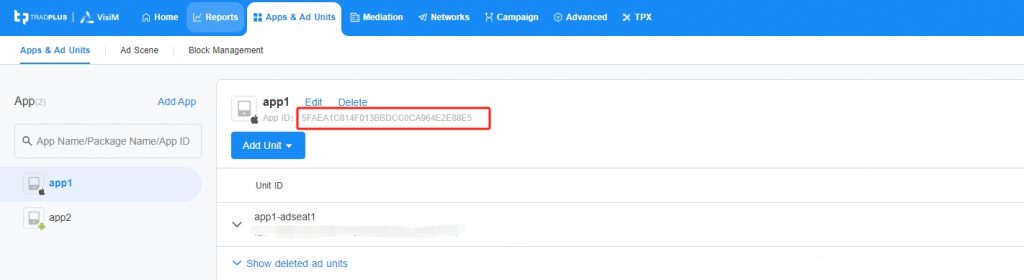
5)Initialization Configuration [It requires the application ID you created on TradPlus VisiM].
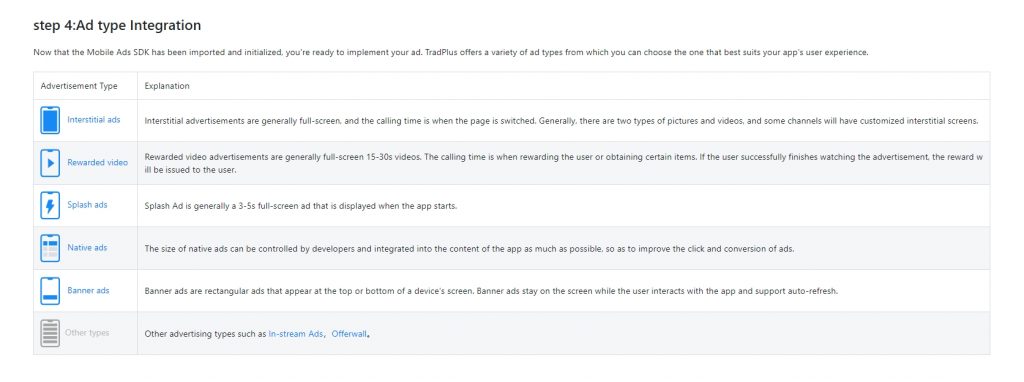
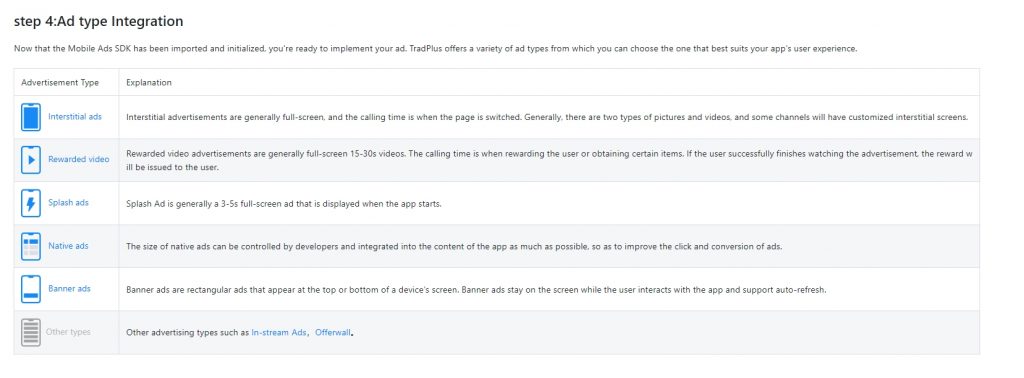
6)Ad format Integration【Please follow the integration documentation for each ad format on TradPlus VisiM】
7.1.2 iOS SDK Download Guide
1)Go to the download address and select the SDK configuration.
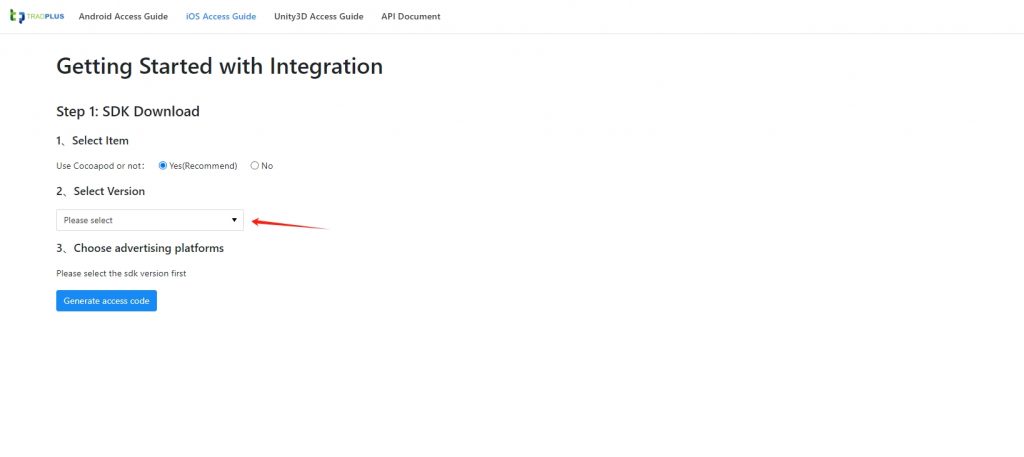
| SDK Information | Instruction |
|---|---|
| Use Cocoapod or not | Recommended [Yes] |
| Select SDK Version | Select the appropriate SDK version. The latest version is suggested. |
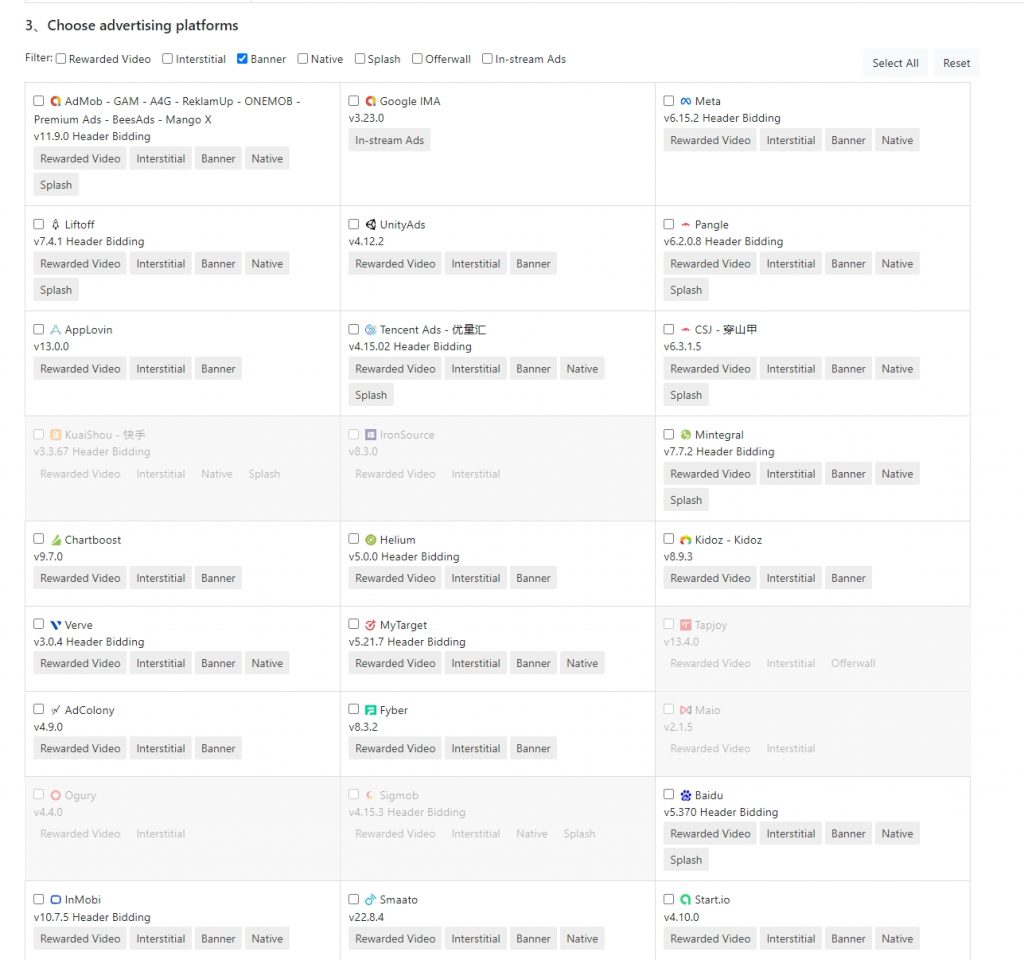
2)After selecting the SDK version, follow the prompts on the page to continue selecting the ad format and ad networks.
Note:
Different ad networks support different ad formats. Please decide on the ad formats you want to integrate and TradPlus will suggest on the ad networks.
As you can see in the screenshot below, after selecting [Banner], some of the ad networks are grayed out, indicating that these ad networks do not support banner ads for the time being.
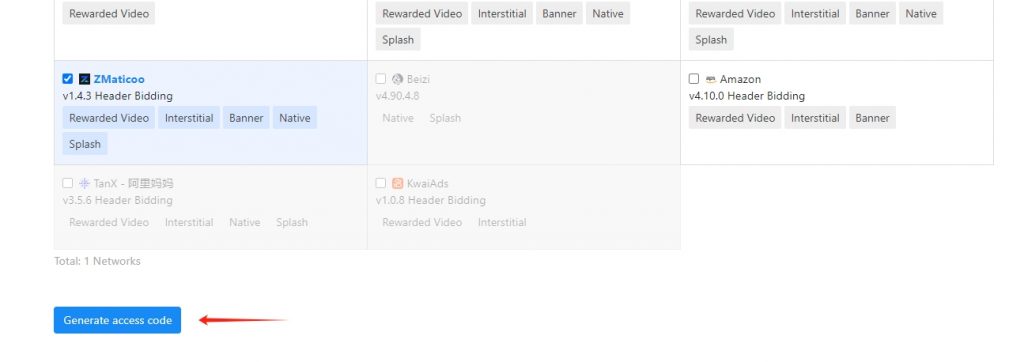
3)After selecting the ad networks, click [Generate Access Code].
4)Copy the [Cocopod code] information and save it to a local file for use when integrating the SDK.
** If you select [No] for “Cocopod access” at step 1), skip this step and proceed directly to step 5).*
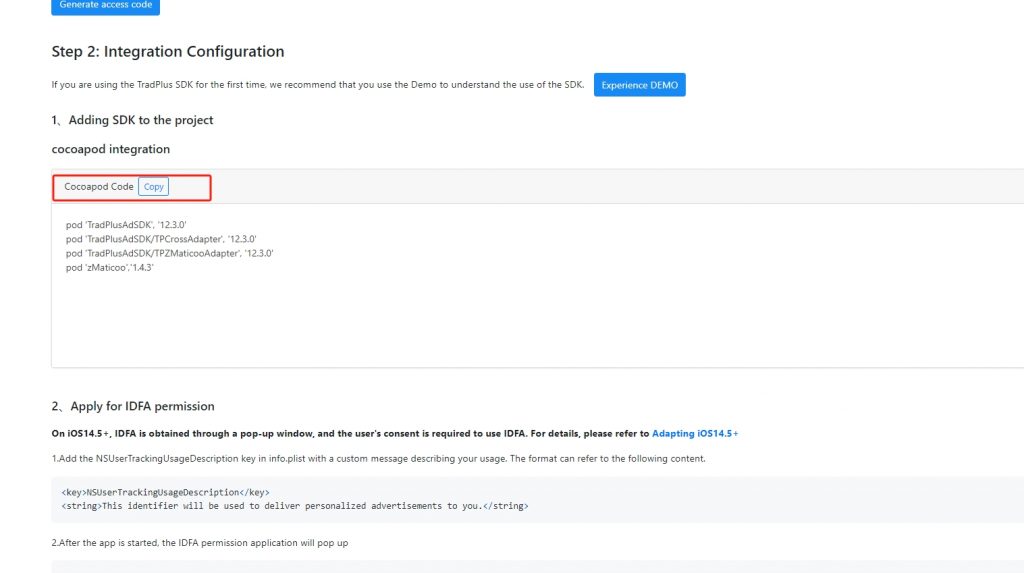
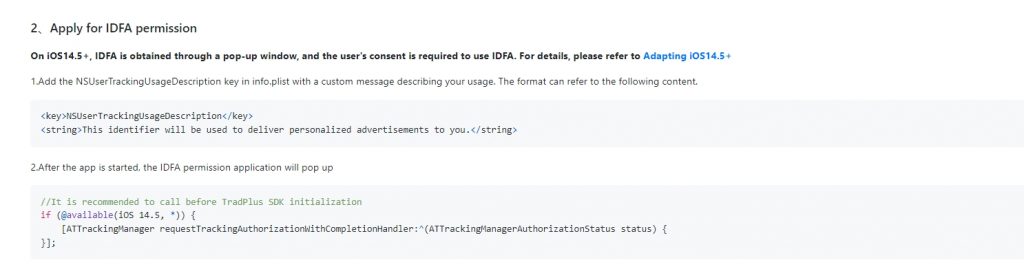
5)Apply for IDFA permission
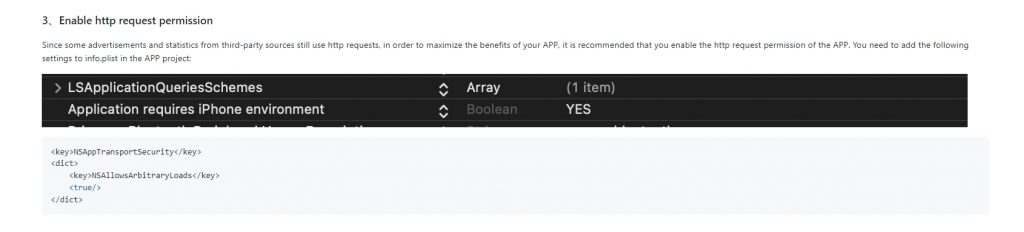
6)Enable http request permission
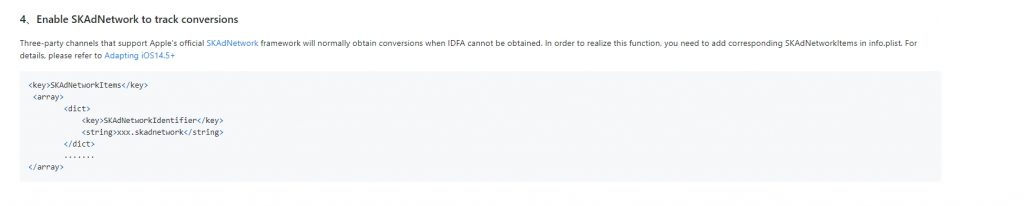
7)Enable SKAdNetwork to track conversions
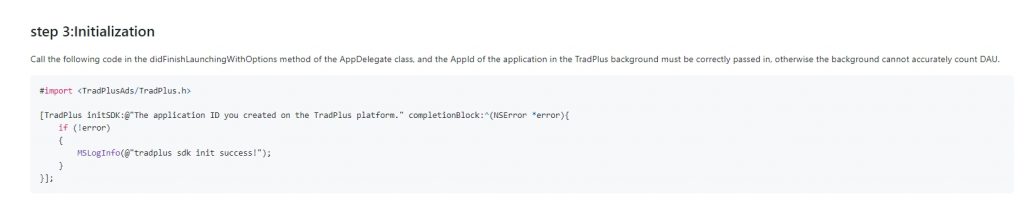
8)Initialization【Please pass the correct AppID of the application on TradPlus】
9)Ad format Integration【Integrate ad formats according to TradPlus integration documentation】
7.2 SDK Integration Guide
See the development documentation:
Android SDK Integration Guide:TradPlus SDK Integration Guide(Android) | TradPlus Knowledge Center
iOS SDK Integration Guide:TradPlus SDK Integration Guide(iOS) | TradPlus Knowledge Center
8. Integration testing
In order to facilitate developers' testing, TradPlus provides [Test Mode].
Check the below link for configuration:How to use Test Mode | TradPlus Knowledge Center
9. Data analysis and optimization
Based on years of industry experience and success cases, TradPlus has summarized some insights on data analysis and operation. More detailed information can be found here:Analyzing Data with TradPlus Funnel Models、Data optimization solutions